Secure browser-to-proxy communication - again
I’ve previously blogged about a secure connection between browser and proxy. Unfortunately that doesn’t work on Android yet, since except if you use Google for Work (an enterprise offering) you can’t set Proxy Auto-Config.
This post shows you how to get that working for Android. Also it skips the stunnel hop since it doesn’t add value and only makes Squid not know your real address. I’m here also using username and password to authenticate to the proxy instead of client certificates, to make it easier to set up.
Hopefully this feature will be added to Chrome for Android soon (bug here)
but until then you’ll have to use the Android app Drony.
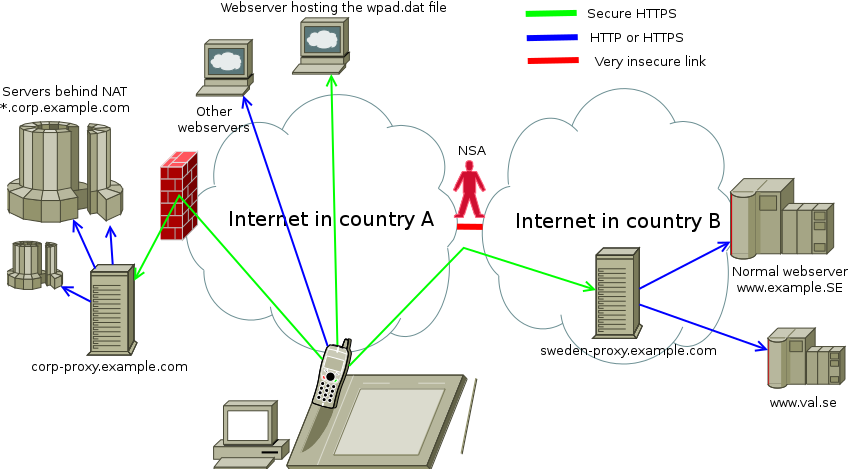
First, why you would want to do this
You have machines behind NAT
… and a proxy that can see the inside while still accessible form the outside
This way you can port forward one port from the NAT box to the proxy,
and not have to use different ports everywhere. I’ll call this proxy
corp-proxy.example.com.
You have servers that don’t implement their own authentication
… and you want the proxy to do it for you
If you set up so that the only way to connect to the servers is via
the proxy, then all access will be encrypted and
password-protected. You won’t get a green lock in your browser address
bar since it’s only protected between browser and proxy, not all the
way to the web server. This also applies to corp-proxy.example.com.
To encrypt traffic crossing country borders
For all traffic going to Sweden, you want to securely connect to a proxy in Sweden,
so that even traffic to unencrypted websites is encrypted when it’s going across borders.
I’ll call this sweden-proxy.example.com.
How to do it
1. Get a real SSL certificate for your proxy
LetsEncrypt and StartSSL.com have free
certificates. Put the .crt and .key files in /etc/squid3/. This
blog post does not discuss the big topic that is the security of CAs
and SSL.
2. Build and install Squid from source
For licensing reasons, the Squid package on Debian is build without SSL. So let’s make a .deb and install it.
$ apt-get source squid3
 ...
$ sudo apt-get build-dep squid3
 ...
$ sudo apt-get install devscripts build-essential fakeroot libssl-dev squid-langpack
 ...
$ cd squid3-3*
$ vim debian/rules  # Add --enable-ssl among the flags.
$ ./configure
 ...
$ debuild -us -uc -b
 ...
$ cd ..
$ sudo dpkg -i squid3_3*.deb squid3-common_3*.deb
 ...
3. Configure Squid
$ sudo tee /etc/squid3/squid.conf > /dev/null
acl to_localhost dst 127.0.0.0/8 0.0.0.0/32 ::1
auth_param basic program /usr/lib/squid3/ncsa_auth /etc/squid3/passwd
auth_param basic realm proxy
acl authenticated proxy_auth REQUIRED

http_access deny to_localhost
http_access allow authenticated

# Effective turn off unencrypted connections.
http_port 127.0.0.1:3127
https_port 3128 cert=/etc/squid3/proxy.example.com.crt key=/etc/squid3/proxy.example.com.key
^D
4. Create allowed users
$ sudo apt-get install apache2-utils
 ...
$ sudo touch /etc/squid3/passwd
$ sudo htpasswd /etc/squid3/passwd alice
 ...
$ sudo htpasswd /etc/squid3/passwd bob
 ...
5. Restart squid<
$ sudo /etc/init.d/squid3 restart
6. Create a wpad.pac file somewhere that’s reachable on the web
$ cat > /var/www/wpad.dat
function FindProxyForURL(url, host) {
    if (dnsDomainIs(host, ".corp.example.com")) {
        return "HTTPS corp-proxy.example.com:3128";
    }
    if (dnsDomainIs(host, ".se")) {
        return "HTTPS sweden-proxy.example.com:3128";
    }
    return "DIRECT";
}
^D
OK, that’s it for the proxy. Now to set up the clients.
7. For Android devices: Install Drony
8. For Android devices: Set up Drony
In Drony/Settings/”Wifi”/Name of network you’re on (“Network not listed” is 3G), set:
- Under “Script”, set the URL, press the download button, and save.
- Back under “network details”, set “Proxy type” to “Script”
Then in Drony, swipe right and press the “On” button.
9. For Desktop/Laptop: Set up proxy in Chrome
(or other favourite browser with HTTPS proxy support)
Menu->Preferences->Under the Bonnet->Change proxy settings->Automatic Proxy Configuration
Set the URL to where the file is, including “https://”.
10. Try to browse somewhere.
When asked for username/password, enter them. Drony/Chrome will cache them.
Check /var/log/squid3/access.log if anything fails.
Other notes
- You can set up authentications other than password, such as client certificates. But I don’t know if Drony supports them.
- Please star the Chrome bug about .pac files.
- If your .pac file returns “PROXY “ then it will connect
unencrypted. HTTPS over it is still safe since that encrypts
end to end.
- Yes, that means that if you run HTTPS to the proxy and connect to an HTTPS site, you are tunnelling HTTPS inside HTTPS.
- Proxy Auto-Config on Wikipedia.
- List of functions available in .pac files